My Christmas card quilt from 2015, Wreath-o-rama (shown below), figures prominently in the design lecture I give at quilt guilds because I ran into almost every challenge imaginable when designing and executing this quilt. Everywhere I take it, people ask me if I sell the pattern.

Wreath-o-rama, 2015, 60" x 60"
The dilemma for me was that although the pattern existed on my computer, it was in a hundred or so different files. Pulling all those files together into one comprehensive and cohesive document was beyond daunting, so I decided to do it one block at a time, as a series, or Block of the Month (BOM).
Part #1: Snowmen block
Since a pattern for the block with the dancing snowmen seemed to be the most in demand, in March 2018 I released that pattern. A paper version of the pattern for this 18" block can be found in my online shop on Etsy.com at this link and a digital (pdf) version can be found at this link.

18" Snowmen block
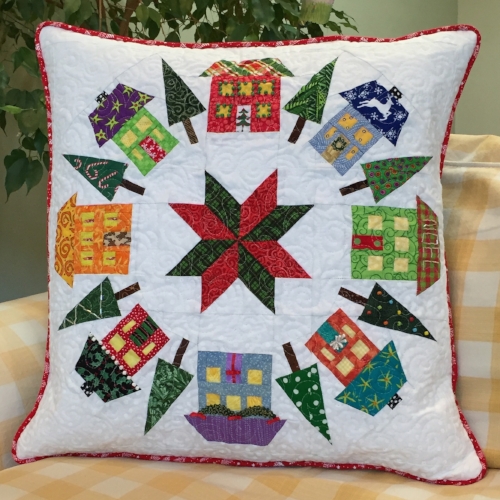
Guessing that most folks won't want to take on recreating the entire quilt, I thought it would make sense to make a quilted holiday pillow out of the block. I think the smaller execution also has appeal as a guild workshop, as it's a project that would be far faster to finish than a whole quilt. And it's cute to boot!

20" Snowmen block quilted pillow
Part #2: Houses block
For the April pattern release, I recreated and wrote the pattern for the houses block. What's fun about this block is that, in addition to using festive fabrics, the houses can be embellished to further dress them up for the holidays. I like to add beads as stand-ins for Christmas lights on these tiny homes -- for example, spelling out "Noel" on one roof. I also added a wreath on one door, a swag of garland with bows on another house and candles in the window of a third, as seen below.

18" Houses block (quilted & embellished)
I waited until after I quilted the block to photograph it as the beads don't go on until that point. If you add beads beforehand, you risk breaking the sewing machine needle -- or doing your sewing machine even greater harm -- if you hit a bead.
A paper version of the pattern for this 18" block can be found in my online shop on Etsy.com at this link and a digital (pdf) version can be found at this link.
I made a quilted holiday pillow out of this block as well. This would be a perfect project for someone who doesn't want to take on making all nine blocks in my quilt. Directions on how to make a pillow out of the block are included in the pattern.
20" Houses block quilted pillow
Part #3: Candy canes block
For May, I released the candy canes block. This is one of the simpler blocks as it is made up of fewer pieces and there's no need for embellishment. The thing to keep in mind when making this block is to position the fabric so that the object looks like a candy cane. I kept the angle of the stripes consistent and positioned the red portions of my wide red-and-white striped fabric at the ends of the candy canes and the parts that bend to reinforce the shape.

18" Candy Canes block

20" Candy Canes block quilted pillow
Part #4: Trees block
For the June release, I recreated the trees block. This was the first block I designed and made for the quilt, confirming my hunch that I could take a Christmas motif and spin it into a wreath shape.
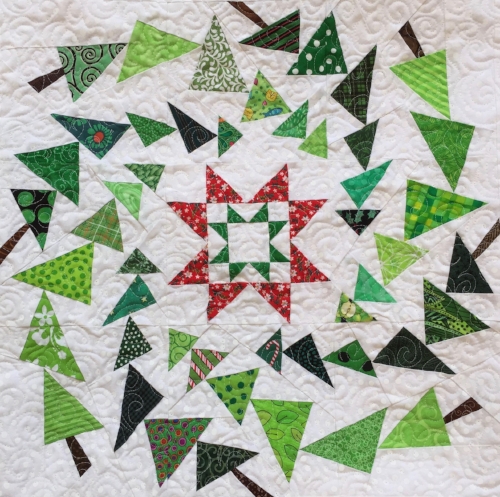
18" Trees block (quilted)

20" Trees block quilted pillow
Part #5: Stockings block
For July, I released the trees block. The design of this block took inspiration from the candy canes block as both feature an oblong item in circular repetition.

18" Stockings block

20" Stockings block quilted pillow
Part #6: Candles block
For the August pattern release, I recreated and wrote the pattern for the candles block. My first stab at the design had all the candles evenly spaced around the circle. But when they were grouped into sets of three, I thought they were more instantly recognizable as candles.

18" Candles block

20" Candles block quilted pillow
Part #7: Mittens block
For September, I released the mittens block. The design features eight pairs of mittens arranged in the shape of a wreath.

18" Mittens block

20" Mittens block quilted pillow
Part #8: Ornaments block
For October, the release was the ornaments block. The design features 32 ornaments arranged in the shape of a wreath. Each is embellished with a skinny red ribbon hanger.

18” Ornaments block (quilted & embellished)
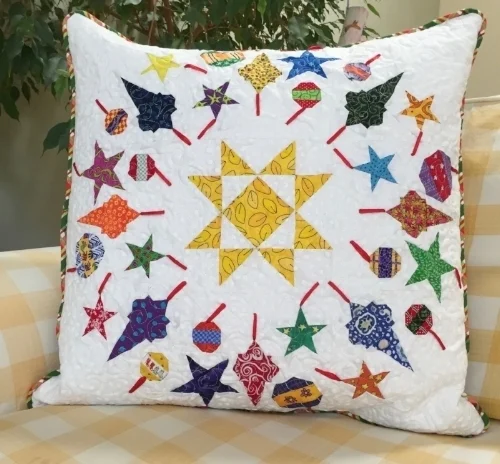
20” Ornaments block quilted pillow
Part #9: Lights block
For November, the final release was the lights block. The design features 36 light bulbs all connected by a couched cord.

18” Lights block (embellished)

20” Lights block quilted pillow
Assembling the quilt
As all the blocks are the same size, the blocks can go together in a variety of arrangements. Either use my arrangement or whatever you think is best for your blocks. I used 1” sashing between my blocks, made from the same fabric as I used for the background of all the blocks — for a look of floating blocks. Then using the background fabric again for a thin (2”) border reinforces the floating affect. All seams should be 1/4-inch.
Cut six vertical sashing pieces – each at 1-1/2” x 18-1/2”. Sew these between the blocks to make three rows, each with three blocks in them.
Then cut two horizontal sashing pieces – each at 1-1/2” x 56-1/2”. Sew these between the rows to complete the quilt body.
Next, cut two vertical border pieces – each at 2-1/2” x 56-1/2”. Sew these on the right and left sides of the combined blocks.
Finally, cut two horizontal border pieces – each at 2-1/2” x 60-1/2”. Sew these on the top and bottom sides of the combined blocks to complete the quilt top.
Once the quilt top is complete, layer it on top of batting & a backing fabric. Pin baste the three layers together then quilt as desired. Bind your quilt, add a sleeve and a label and enjoy it.

Above are the quilt top elements in pieces, then assembled into a quilt top, with sashing between the blocks and a skinny border all around.